YOUR CART
- No products in the cart.
Subtotal:
$0.00
BEST SELLING PRODUCTS
[youtube-feed feed=5]
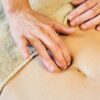
One of David’s favorite exercises to give to clients when he determines that there is a need to rehab an old ankle sprain that is likely contributing to a client’s other conditions such as low back pain, knee pain, hip pain, and even neck pain!
Video Source: Bodyworks DW Youtube Channel
Author & Host: David Weintraub LMT
Additional Demonstrator: Karl Urban LMT
DW: I’m going to show a quick foot retracting exercise that I give to a lot of clients to rehab an old ankle sprain or to help find better balance in their feet.
Most of us in some point in our life have had an ankle sprained or two or ten and that causes the ankle almost all the time to roll outwards this way. You have a compensation that your brain does rather than leave your foot rolling out sideways because it doesn’t feel right just walking on the edge. And that is to externally rotate your hip or your knee or both and that allows the foot to fall more that way.
You’ll see some clients will show you this one foot out other clients will show you the other and some show both, right? This is really a long-term compensation for a stuck ankle that never got unstuck. What’s supposed to happen when you walk is that you roll through the ball of your big toe when you come forward that way right and that should stay contacting as the very last thing until you bring your foot forward.
With an old ankle sprain you’ll get some version of this and that big toe never contacts the floor completely. And so to relearn how to do that I have a very simple exercise!
You’re going to start with your feet in neutral which is not out here not here but actually pointed straight forward ankles underneath under hips and you’re going to bring one foot forward just so that the toes of the back foot are equal with the heel of the front foot.
Next, you’re going to bring your weight onto the back heel.
The idea here is that from your pelvis up everything floats forward and back without tilting or moving sideways or shifting right. And so my goal is to bring the weight from my back heel up onto my front foot and to have that track smoothly in a nice forward motion. And not skip over each joint that needs to bend in the back leg.
And so to do this properly what I need to do first is bend the back knee and the back big toe and that allows me to keep contact with the floor with the back big toe, right? And so I learn and relearn how to roll through that big toe I’ll just have clients do this nice and easy and smooth shifting forward shifting weight back trying to keep it from being a side to side motion. Try not to be unbalanced.
Half the time I’ll give this something that looks super simple because I’ve been doing this for years and I’ll give this to a new client and they just can’t like balance because the intrinsic muscles of the feet are just not working properly. My own right ankle was beat up about seven years ago so I’m probably less smooth on this side. I can feel a little bit of a diagonal shift happening so I could do more homework on my own.
Just coming forward and back like a set of ten a day nice and smooth preferably in front of a mirror so that you can really see that you’re smoothly doing it can really retrain the foot. So that when you take a step and roll through it actually contacts the floor properly and all of the biomechanics of your step goes straight up. And you float through each stride as opposed to stomping and falling into each stride.
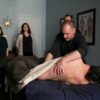
Okay I’m gonna have Carl try this exercise for the first time and I’m partly doing it so that you can see that if you don’t know what this feels like it’s actually a lot harder than it looks. I made it look easy because I’ve been doing it for years.
The first thing I notice looking at his feet is that his right foot is a little externally rotated compared to the left so I want you to bring your toes in a little bit. That’s good!
Okay I also noticed that when he does that his upper torso tilts a little bit to the right we would work on that in session in a rib cage session but that’s not what we’re talking about today so now I want you to bring your left foot forward a foot length so that your left heel is where your right toes are. Just straight forward a little bit maybe a half inch…yeah good!
Okay great so now all I want you to do is put your weight into the back heel on the right and notice that your instinct without realizing it was then to turn the foot out again so bring your right heel out just a smidge. Yep there you go…. okay. And now I want you to try and shift everything from the back foot to the front foot starting with bending the back knee and then the back big toe and coming forward onto your toe bed keeping contact with the ball of the big toe.
Yep good…now try to shift back slowly keeping that heel from falling in because we want yep and now try to come forward again notice that he’s got to move diagonally with the upper body to his left to make this work we want that to be straight fall back I’m going to come in frame now and help him…
So now come forward, come back
There we go now it’s getting a little smoother! And what do you feel in your ankles and feet in terms of stuff that’s maybe firing weird or feeling tired?
Karl: doing this it’s a lot in my right hip
DW: Yeah okay that’ll do it 🙂
So note that if somebody’s coming complaining about hip flexor stuff that might be the source of it… the big toe not tracking properly and potentially his subtalar joint also being a little stuck! There that’s a little smoother…
Good yeah definitely yeah there’s a there’s a distinct want to move away and not really trust that big toe!
All right…. and that’s really happening to you every step is that you’re slightly speed skating to avoid having to feel that joint contact the floor…. that’s better, yeah switch sides…now make sure that right heel doesn’t yep there yeah
That’s a little smoother…yeah that looks nice
Even here this [opposite big toe] is lifting up when you’re going backwards so bring that in and just keep it there
Nice…. there we go
And so a set of 10 on each side would really just help build up the intrinsic muscles of his feet and have them tracking more smoothly in gate in running and walking climbing stairs etc etc cool thank you thank you!


Pingback: